Sunday, November 6, 2011

[Tutorial] Navy & Brown Make-Up Tutorial


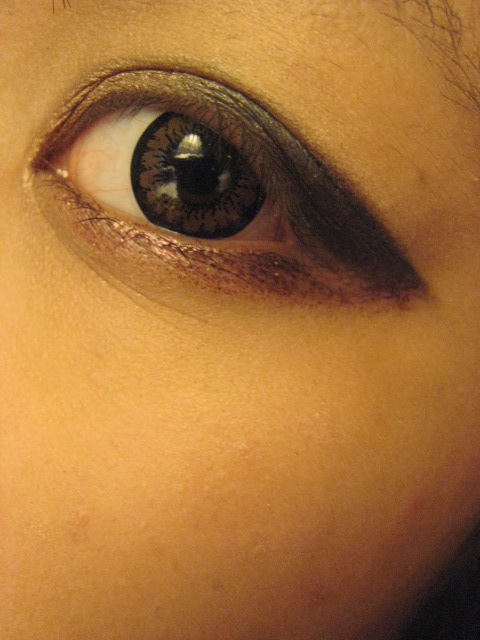
I came up with a navy blue-brown make-up of which looks quite formal but still effortlessly stylish. As much as I had difficulty choosing shades,  I hope you have fun trying out this look :D


After priming both eyelids, put Woodwinked on the inner corners and blend it outwards. Having your eye socket as guideline, apply it just below the double eyelid line.


Apply MAC's Chocolate Brown pigment (mixed with mixing medium) on the outer corner. I made wings of which stretch outwards but it's totally up to you. Gently blend where Woodwinked and Chocolate Brown meet. (I actually blended it out so that the navy shade becomes the centre of the focus but you can keep it that way if you want.)


Apply a black eyeshadow just above the crease (or in my case, just above my double eyelid line). I made sure that the shadow is not too visible because I wanted to keep it natural but you can use a pigmented eyeshadow for a more intensified look.


Then, blend it just above the crease and in towards the inner corner. Make sure that these lines aren't too defined. These will be only the guidelines for the navy blue eyeshadow.


Then, a blue eyeshadow will be placed just above the outer crease and blended inward (towards the inner corner) where black eyeshadow was applied. Again, blend upwards. You're now left with the choice of blending the borders betwen navy blue and brown eyeshadow. I blended out the borders (edges?) to look more natural. 

...And I think that's it! This is very attractive, eye-intensified look, of which doesn't look overdone.  


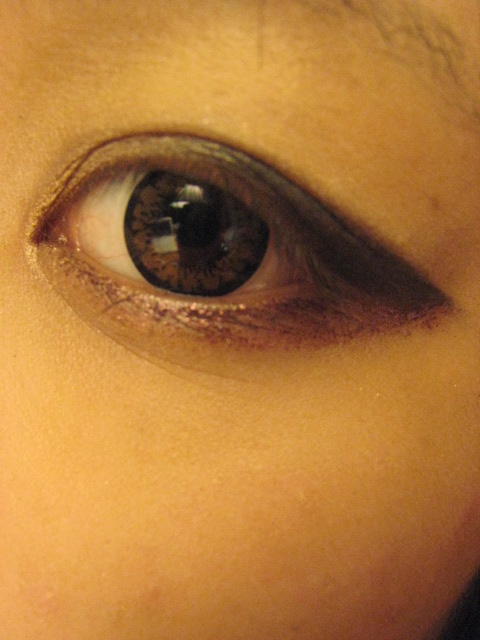
(I decided to show you how it looks like when leaving the border between Woodwinked + Chocolate Brown and the blue eyeshadow more visible. This is how it looks like :D)

Hope you liked this tutorial and, if you like more tutorials and reviews,
please subscribe or follow me on Twitter @CDistrict900212 :)

xoxo
cynthia.

Tuesday, November 1, 2011

[Tutorial] The Heart of Eternity Make-Up Tutorial


Hi everyone! I was requested (by my friend) for a quick and inexpansive party look that will suit her blue dress. I don't really wear blue eyeshadows because my face is very warm-toned; however, this was a special occasion and I decided to try anyway.


Information and Picture Credit of "The Heart of Eternity":
http://mostexpensivediamond.org/


Let's begin!


Apply a primer first and use L'Oreal Colour Infallible Eyeshadow in #15 Flashback Silver in the inner corners of your eyes and just below your lash line. This will really give that pop to your eyes. One warning, though, is that this shadow has quite a bit of fall-out so you will want to reduce the amount by wetting your brushes before applying eyeshadows.


Next, take MAC's Blue Storm pigment and apply it on the outer corner and just above the crease (and if you don't want such sharp edges like my look, then blend the sharp edges of the eyeshadows). Blend the center of the eyelid with a blending brush so that Blue Storm and Flashback Silver can create a nice gradation.


Finish the look (yes, it's almost already finished) with MAC Blitz & Glitz eyeliner. Since it is a party look, create a wing to accentuate the eyes. Connect the wing with the lower eyelash and make the lower wing to fade away.


And that's it for the eyes! To move on, I will avoid using any bright red eyeshadow to avoid looking like a clown. Only clowns wear blue eyes, red noes, red cheeks and red lips. Instead, I'll use bronzer to give some contouring (FitMe! in Light Bronze).

Same logic goes for the lips. My advice is to use warm-toned nude lipstick.


Now, this is the final look of "The Heart of Eternity". According to mostexpensivediamond.org, this is the eighth most expansive diamond. This 27.64 carats (5.528g) daimond from South Africa is rated as Fancy Vivid Blue. This make-up is as illuminating and breathtaking as the diamond is.  Have fun :)


xoxo
cynthia.

Monday, October 31, 2011

[Tutorial] Haunted Little Red Riding Hood Make-Up Tutorial


Hey everyone! I hope you all are preparing well for Halloween.
I had a Halloween party last Friday and this was my last minute make-up but I had great compliments from my guy friends so I decided to share this tutorial.


Let's Begin!


Here I am, either barefaced or with very minimal make-up (i.e., base & eye primer).
(yes, I'm assuming this is the one without make-up 
because I'm covering my face with my hair...lol) 


I applied MAC's Woodwinked on the inner corner and Forest Green Pigment on the outer corner. I blended Forest Green with a dry brush without mixing medium and it turned out to be a beautiful daily look (and this is what I wore to work). However, we're not aiming for a daily look, are we?


Now, this is what you're willing to get.
A metallic forest green.


Now, I wet my brush with mixing medium and 
topped the daily look with more of the Forest Green to accentuate the eyes.
Now, this is completely optional but I made that sharp edges on the outer corners and intentionally didn't blend them for sharp and defined look 
(if you are not a follower of mine, I do that all the time xD).
If you want, you can do so.


Next, I wanted to look haunted since it was Halloween party (but not to the point where I look trashed), so I took Reflects Blackened Red glitter and mix it with Missha's Magic Eyechange to apply them on the lower lash line.


(And, again, this is optional but I mixed Woodwinked with Colour Infallible in #015 Flashback Silver on the inner corner of my eyes to brighten the inner corners of my eyes)


I used MAC's Glitz n Blitz and Maybelline NY Volum' Express the Falsies to finish off.

And that's it for the eyes :D


Products Used:


I wanted the overall look to appear very natural since eyes are so accentuated,
so that the focus is on the eyes, not here and there. I still added minimal amount of bronzer on my cheeks and jaw area (very very minimal so that it shapes the face). 


I hope this tutorial was helpful and if you want more make-up tutorials,
please follow my blog and/or my twitter @CDistrict900212 :)
Thank you so much and I hope you have a wonderful Halloween!

(+)

This is my look and sorry for the blurriness but
this is the only picture I could get without others in the photos.
I'll come up with more pictures. Stay tuned!


xoxo
cynthia.